
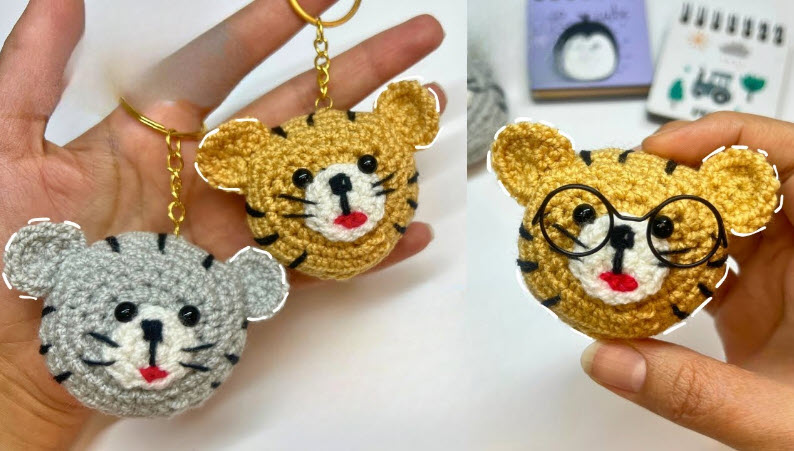
Bold black stripes, rounded little ears, and a gently curved tail give a crochet tiny tiger keychain big personality in a small package. Clip it to a backpack, hang it from a purse, or add it to your keys, and it brings a bit of fun to everyday errands.
The best part is how approachable the pattern is. It uses simple stitches, basic shaping, and very little yarn, so it’s an easy way to try amigurumi without committing days to a large project.
The tiny tiger keychain amigurumi pattern works as a relaxing weekend make or as a new addition to a growing collection of crochet animals.

Why You’ll Love the Tiny Tiger
- Beginner-friendly construction
- Quick afternoon project
- Uses leftover yarn
- Lightweight and practical
- Easy to personalize
- Minimal sewing
- Made for everyday use
- Cute decorative charm
Skill Level and Time
Difficulty: Beginner
Time: A quick afternoon project
You’ll only need a few basic skills:
- Magic ring
- Chain stitch
- Single crochet
- Increase
- Decrease
- Slip stitch
- Simple embroidery
- Basic sewing
If you’ve finished a few small amigurumi pieces, such as the crochet owl keychain, the tiger will be easy to follow.
Materials You’ll Need
Gather everything before you start.
Yarn
- Orange yarn
- White yarn
- Black yarn
- Pink yarn for optional cheeks
Tools
- Crochet hook suited to your yarn
- Polyester fiberfill
- Stitch marker
- Yarn needle
- Sharp scissors
- Jump ring
- Keychain ring
Optional Extras
- Safety eyes
- Fabric glue
- Blush powder
Finished Size
The finished tiger stands about 3–4 inches tall before the keychain ring is added. The small size makes it easy to carry every day.
Pattern Notes
- Work the pieces in continuous rounds.
- Use a stitch marker to track the start of each round.
- Count your stitches carefully.
- Keep your tension consistent.
- Stuff gradually as you go.
- Weave in all loose yarn ends.
Following these simple habits leads to a much cleaner finished tiger.
How to Crochet the Tiny Tiger Keychain
Each part of the tiger is crocheted separately and then sewn together. Take your time and watch the little tiger come to life piece by piece. The video below shows the full process, so use it alongside the written steps.
Step 1: Crochet the Head
With orange yarn, make a magic ring and work 6 single crochet stitches into it. Increase evenly over the following rounds until the head is smooth and round, then work a few rounds without increasing.
Begin decreasing and stuff the head firmly as you go. If you’re using safety eyes, insert them before the opening gets too small. Finish decreasing to close the head.
Step 2: Create the Muzzle
Crochet a small oval with white yarn. Add a little stuffing if you like. Position the muzzle snugly just below the eyes and sew it on with invisible stitches. Careful placement here gives the face a well-balanced expression.

Step 3: Embroider the Face
Using black embroidery thread, stitch a tiny triangle nose on the muzzle. Add a short vertical stitch below it, then a soft curved line for the smile. Small embroidered eyebrows can add extra personality.
Step 4: Crochet the Body
Start a new magic ring with orange yarn. Increase evenly until the body is slightly wider than the head, then work even rounds before making gentle decreases. Stuff as you crochet so the body feels firm but not hard. Once finished, sew the head securely to the top of the body.

Step 5: Crochet the Ears
The rounded ears are one of the tiger’s most recognizable features. Crochet two small rounded ears with orange yarn, adding tiny white inner-ear pieces if you like. Pin them to the head before sewing, and take your time with placement, since the ears can make or break the look.
Step 6: Crochet the Arms
Make two thin arms and stuff them lightly. Sew one arm to each side of the body, angled naturally so the tiger looks relaxed and friendly.

Step 7: Crochet the Legs
Make two legs slightly thicker than the arms and stuff them lightly. Pin them evenly to the bottom of the body, then set the tiger on a flat surface to check that it sits level before sewing them in place.
Step 8: Crochet the Tail
With orange yarn, chain enough stitches for a long tail. Work single crochet back along the chain. Add a small black tip for a realistic finish, then sew the tail securely to the back of the body. A gentle curve gives the tail movement and character.
For fans of mini tiger amigurumi, the tail is also the easiest place to give each tiger its own look.

Step 9: Add the Tiger Stripes
With black yarn or embroidery thread, stitch small stripes across the:
- Forehead
- Back
- Arms
- Legs
- Tail
Keep the stripes a similar length and space them evenly.

Step 10: Attach the Keychain Ring
Crochet a tiny loop and sew it to the top of the head. Attach the jump ring to the loop, then add the metal keychain ring. Test every connection before use so your tiger stays secure wherever you go.
Creative Color Ideas
Try one of these combinations:
- Bright orange with bold black stripes
- Golden yellow with dark brown stripes
- White tiger with silver-gray stripes
- Pastel orange with cream accents
- Light brown with chocolate stripes
- Ivory for a subtle look or peach for a brighter one
- Gray with black markings
- Rainbow stripes for a playful twist
Tiny bows, scarves, or mini hats can turn your tiger into a seasonal character.

Creative Uses for Your Tiger
Beyond keys and bags, the small, lightweight tiger works in plenty of other ways:
- Add a cheerful touch to your craft room.
- Display several together as a mini jungle.
- Tie one onto a gift bag in place of a gift tag.
- Decorate a storage basket.
- Make tigers in different colors to give to family members.
The pattern works up quickly, so you can make several tigers in different colors without spending much time.
Tips for a Professional Finish
Small finishing touches make a big difference in amigurumi. Keep your stitches tight enough to hide the stuffing. Pin every piece in place before sewing, especially the ears and tail, so you can adjust them until they look right.
Pro tip: Embroider the stripes after the tiger is fully assembled. Seeing the whole body at once makes it easier to keep the markings balanced on both sides.
Use short, neat stitches for the stripes instead of long ones for a cleaner, more realistic tiger. Finally, weave each yarn tail through the body and secure it tightly so the keychain holds up to everyday wear.
Common Mistakes to Avoid
- Adding safety eyes too late: Insert them before the head opening gets too small to reach inside.
- Overstuffing the arms and legs: Light stuffing keeps them slim and easy to sew on.
- Sewing pieces without pinning first: Unpinned ears and legs often end up crooked or uneven.
- Stitching stripes before assembly: Markings added too early rarely line up across the finished body.
- Skipping the connection check: Always tug the loop and rings before clipping the tiger to your keys.
Caring for Your Tiny Tiger
A keychain goes almost everywhere with you, so a little care goes a long way:
- Spot clean with a soft damp cloth.
- Use mild soap if needed.
- Don’t soak it in water.
- Let it air dry.
- Keep it away from high heat.
- Check the jump ring now and then to make sure it’s secure.
With proper care, your handmade tiger will keep its shape and its yarn will stay looking fresh.
Why Tiny Amigurumi Projects Are So Popular
Mini crochet projects are fun, practical, and satisfying. They teach core techniques while giving you something useful in a short time. With the tiger, you’ll practice how to:
- Crochet smooth rounds
- Shape small pieces
- Stuff evenly
- Embroider simple faces
- Attach parts securely
- Assemble amigurumi neatly
Each small project builds skills for more detailed crochet animals later. Once your tiger is done, a crochet fried egg keychain makes a fun, quick follow-up.
Make Every Tiger Unique
Every handmade amigurumi ends up with its own character. Try giving your tiger different accessories and expressions, such as:
- Small winter scarf
- Miniature bow tie
- Tiny flower tucked behind one ear
- Sleepy embroidered eyes
- Tiny backpack
- Festive party hat
- Heart-shaped patch
- Tiny overalls
Little details like these turn one simple pattern into a whole group of unique handmade friends. As your skills grow, you’ll keep finding new ways to personalize each tiger.
Final Thoughts
Making a little tiger keychain is creative, relaxing, and practical all at once. The rounded ears, embroidered smile, black stripes, and curved tail all come together to give a tiny piece a warm, lively personality.
The pattern is easy enough for beginners yet flexible enough for plenty of variations. Swap yarn colors, try new expressions, or add small accessories to make each tiger special.
After your first crochet tiny tiger keychain, you’ll likely want to stitch a whole jungle of friends. A crochet mini bear keychain would fit right in with the group.