
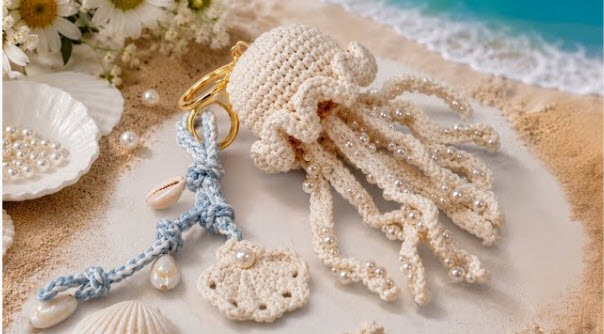
A rounded dome, a sleepy little smile, and a bundle of curly tentacles swinging below make a crochet jellyfish one of the most cheerful charms you can clip to a bag. The crochet jellyfish keychain pattern turns those simple shapes into a happy accessory for backpacks, handbags, purses, and even pencil cases.
Although the jellyfish is small, it has plenty of character. It needs very little yarn and works up fairly quickly, so it fits nicely into a quiet afternoon, a break from a larger project, or a session of using up leftover yarn.
The design is easy to customize, too. Stitch it in ocean blues and greens, soft pastels, or bright shades that pop against a dark bag. Embroidered eyes, a tiny bow, or a few sewn-on beads bring your amigurumi jellyfish to life. After your first one, you may want a whole rainbow of them.

Why You’ll Love the Jellyfish Charm
Small crochet projects let you practice useful techniques without working on the same piece for days. The jellyfish charm is:
- Small and portable
- Beginner-friendly
- Quick to crochet
- A handy use for leftover yarn
- Easy to customize
- Made to hang on bags and backpacks
- Simple to make in many colors
The round body and curling tentacles also make it a sweet addition to any collection of small amigurumi. For newcomers to miniature crochet, it’s good practice for working neatly in the round while keeping the finished piece small.
Skill Level and Time
Difficulty: Beginner
Time: About 2–3 hours
You should be comfortable with:
- Magic ring
- Chain stitch
- Single crochet
- Increase
- Decrease
- Slip stitch
- Working in the round
- Basic sewing
Getting the tentacles just right may take a little practice. You want them light enough to curl on their own without looking bulky.
Materials You’ll Need
Gather your tools and materials before you start.
Yarn
- Main-color cotton or acrylic yarn
- Small amount of contrasting yarn
- Black embroidery thread for the eyes and mouth
- Pink yarn for cheeks (optional)
Cotton yarn works especially well for small charms because it gives neat, defined stitches.
Tools
- Crochet hook suited to your yarn
- Polyester fiberfill
- Stitch marker
- Yarn needle
- Sharp scissors
- Keychain ring
- Jump ring (optional)
- Small clasp or swivel hook for attaching the charm to a bag
Optional Extras
- Tiny beads
- Ribbon
- Extra embroidery thread
- Decorative buttons
For an even smaller charm, use thinner yarn and a smaller hook.
Finished Size
The finished jellyfish measures about 3–4 inches long, depending on the yarn and hook you use.
The size is easy to change. Thicker yarn makes a bigger charm, while thinner yarn makes a smaller one that suits little bags. If you change yarn weight, adjust your keychain hardware and the amount of stuffing to match.
Pattern Notes
- Keep your stitches tight enough that the stuffing doesn’t show through.
- Use a stitch marker to find the start of each round.
- Count your stitches often. On such a small piece, one missed stitch can noticeably change the shape.
- Don’t overstuff. A light hand is enough to form a nice round shape.
How to Crochet the Jellyfish Keychain
Knowing the construction ahead of time makes the steps easier to follow. The jellyfish has a round, stuffed body with a simple embroidered face and several hanging tentacles. Once those pieces are done, the keychain hardware goes on top.
The overall shape is simple, and most of the character comes from your color choices and tentacle style. Watch the video below alongside the written steps.
Step 1: Crochet the Jellyfish Body
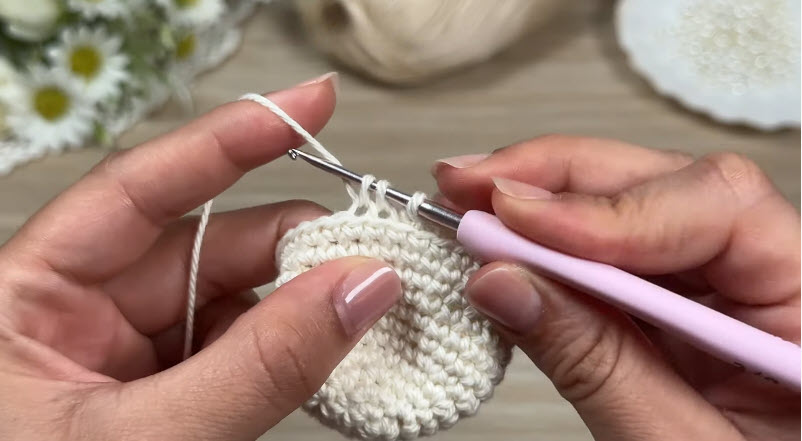
With your main yarn, make a magic ring and work six single crochet stitches into it. Increase over the next few rounds to widen the piece into a rounded top.
Then work single crochet evenly around until the body reaches the height you want. The sides should begin to curve in slightly, forming the jellyfish’s dome shape.
Step 2: Shape the Bottom
Begin decreasing gradually on the bottom rounds. Before the opening closes, add polyester fiberfill a little at a time, spreading it evenly with your fingers. The body should feel firm but not packed tight.
Once the shape looks smooth, keep decreasing until the opening closes. Fasten off securely and weave the yarn end into the body.

Step 3: Add the Face
Keep the face plain or make it expressive. Embroider two small eyes with black thread; they can be round, oval, or a little sleepy. Stitch a tiny curved smile between them, and add a touch of pink blush under the eyes for an extra-cute look.
For charms going to very young children, embroidered features are safer than plastic eyes, which can come loose.
Step 4: Crochet the Tentacles
The tentacles are the most recognizable part of the project. Chain several strands in your chosen yarn, making them different lengths for a more natural look. Work back along each chain with slip stitches or single crochet.
Leave some tentacles straight and give others a slight curve. Four to six tentacles are usually enough for a mini jellyfish crochet charm. Keep them light so they dangle naturally from the body.

Step 5: Make Curly Tentacles
For extra movement, add a few curly tentacles. Chain several stitches, then work more than one stitch into each chain on the way back. The extra stitches push the strand into a natural curl.
Play with the number of stitches to make the curls tighter or looser. Even small changes create very different shapes, which makes the step one of the most fun parts of the project.
Step 6: Attach the Tentacles
Arrange the tentacles evenly around the bottom of the body. For a layered look, place the longer tentacles in the center and the shorter ones around the edge.
Check the underside before sewing, then stitch each tentacle on securely. The tentacles should hang freely without clumping together.
Step 7: Add the Keychain Loop
Crochet a small loop and sew it to the top of the jellyfish. As an alternative, pass a metal jump ring through a few sturdy stitches at the top. Attach your key ring or swivel clasp to the loop or jump ring.
The attachment point takes the most stress once the charm hangs from a bag, so make sure it’s tight. Reinforce the area with a few extra passes of yarn if needed.

Step 8: Add Decorative Details
Now personalize your jellyfish. Try adding:
- Tiny embroidered stars
- Small bows
- Contrasting tentacles
- Mini flowers
- Tiny beads
- Metallic thread
- Small embroidered dots
A small crochet bow placed near one side of the body adds a playful touch.

Creative Color Ideas
Don’t feel limited to classic ocean colors. Try:
- Sky blue with white tentacles
- Lavender with pink accents
- Mint green with cream details
- Peach coral with black tips
- Yellow with orange tentacles
- White with pastel rainbow strands
- Deep navy with turquoise details
Make a few jellyfish in different hues for an underwater-inspired set. For a more understated accessory, neutral shades like cream, beige, gray, and dusty blue look elegant.
Creative Uses for Your Jellyfish
The little jellyfish can do much more than hang from a keychain. Try clipping it to:
- Backpacks
- Handbags
- Purses
- Pencil cases
- Tote bags
- Travel bags
- Crochet project bags
- Zipper pulls
- Camera bags
- Gift packaging
A few jellyfish also make a sweet hanging decoration for a room or a crochet display. They pair nicely with other little sea creatures, such as turtles, whales, starfish, or a quirky crochet fishbone keychain.

Tips for a Professional Finish
On a small project, uneven stitches stand out more. Keep your tension steady and count your stitches often.
Sew the tentacles into the same round all the way around the body so they line up neatly. Pay close attention to the keychain attachment, since even a well-made charm is useless if it falls off after a few days. Tug the loop gently to test its strength before adding the metal ring. Finally, trim and hide every loose yarn end inside the body.
Yarn Substitution Ideas
- Cotton instead of acrylic: Gives crisper stitch definition and a slightly firmer body.
- Acrylic instead of cotton: Softer and widely available in bright colors.
- Thinner yarn with a smaller hook: Creates a tiny charm for zipper pulls and small pouches.
- Variegated yarn for the tentacles: Adds color changes without switching yarns.
- Metallic thread held with the main yarn: Gives the tentacles a subtle shimmer.
Caring for Your Jellyfish Charm
A bag charm goes everywhere with you and picks up dust along the way, so clean it now and then:
- Use a soft brush or lint roller for regular dusting.
- Dab small stains gently with cool water and mild soap.
- Don’t wash the whole charm unless the yarn label allows it.
- Don’t wring it. Squeeze out the water and let it dry completely.
- Check the keychain hardware regularly to make sure it’s secure.
Personalization Ideas
Once you’ve made a basic jellyfish, there are plenty of ways to create a completely different version.
Multicolor Tentacles
Use variegated yarn for the tentacles, or crochet the body in one color and each tentacle in a different shade.
Extra-Cute Look
Add a small bow or embroidered eyelashes.
Halloween Jellyfish
Go spooky with black and purple yarn plus a dash of orange. It makes a fun match for the crochet owl keychain in a fall bag lineup.
Winter Jellyfish
White, icy blue, and silver thread give a frosty seasonal look.
Jellyfish Family
Make a small group of jellyfish, each with a different expression.
Why Mini Crochet Charms Make Great Projects
Small accessories hold a special place in crochet because they don’t take long, yet they’re genuinely useful. A project like the jellyfish lets you practice small shapes, stuffing, embroidery, and assembly, skills that carry straight over to bigger amigurumi.
It also uses up leftover yarn nicely. A jellyfish needs so little that the scraps from a sweater or scarf are often enough. Because the pieces are tiny, they’re easy to take along, too. Crochet a few tentacles while traveling, waiting at an appointment, or relaxing with a cup of coffee. If you enjoy the process, the tiny tiger keychain is another quick charm to try next.
Final Thoughts
The little crochet jellyfish proves that a small project can have plenty of personality. Its rounded body, expressive face, and dangling tentacles make a cute accessory for almost any bag.
The crochet jellyfish keychain pattern is also easy to adapt. Keep the palette soft and simple, go bold with colorful tentacles, or build a whole underwater set of sea creatures.
Take your time shaping the body, give the face an expression you love, and make sure the keychain is firmly attached. Once you’ve mastered the basic build, experiment with colors and accessories to create your own little ocean characters for backpacks, purses, and project bags.