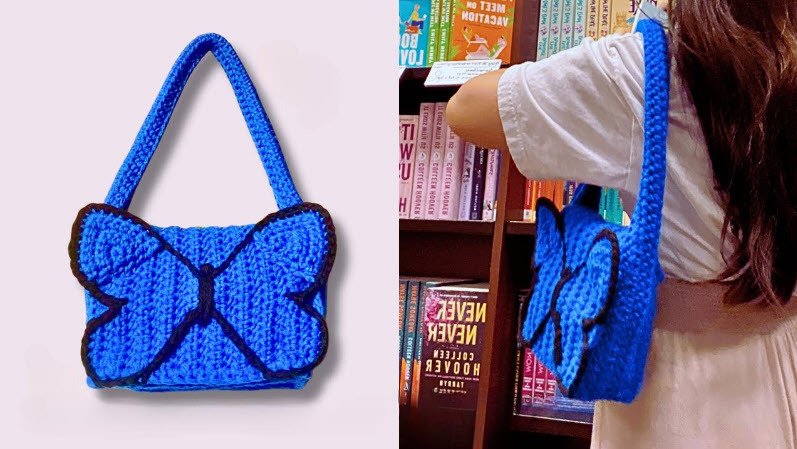
Some crochet ideas are merely useful, and then there are little pieces of wearable artwork. Crochet Butterfly Shoulder Bag fall under the second category. This bag has elegant wings, soft crochet and a gorgeous form, which can make a simple outfit unforgettable.
Throughout the ages, butterflies have been symbols of beauty, freedom and change. When you incorporate that into crochet you have a useful and expressive bag. You don’t have to take an ordinary purse, you can take something that shows your creativity.
The best thing about this cute accessory is that it doesn’t require any complex techniques! Simple crocheting techniques can be used for the main bag, with butterfly wings being done separately and added to the front. Bright colors can be used for a playful summer outfit or neutral colors for a more elegant outfit.
This crochet butterfly shoulder bag pattern can be easily customized as well. Decorate the butterfly with beads or embroidered details, or by changing the wing colors or the length of the strap. Each decision will have a different look for the finished bag.
When you’re in the mood to create a crochet accessory perfect for the elegant touch of the natural world, try your hand at making this beautiful butterfly shoulder bag.
Why You’ll Love This Pattern
This is a bag that combines style and craftsmanship without inducing too much complexity in the process.
Here are some reasons why you’ll love creating it:
- Elegant butterfly design
- Practical shoulder-bag shape
- Beginner-friendly stitches
- Easy color customization
- Lightweight construction
- Decorative wing details
- Adjustable strap
- Great weekend crochet project
This pattern is perfect for those who like to create a crochet butterfly purse, as there’s plenty of space to be creative and make something useful.
Skill Level
Materials: These are just a few of the materials you can use:
Be familiar with:
- Chain stitches
- Single crochet
- Half double crochet
- Double crochet
- Slip stitches
- Increasing and decreasing
- Working in rows
- Basic sewing
Making the butterfly wings will take some patience but the pieces are easy to create.
Materials You’ll Need
Preparing the necessary supplies before starting.
Yarn
- Main-color from cotton or acrylic yarns
- The contrasting yarn should be used to make butterfly wings.
- The antennae has a small black yarn.
- Yarn that can be used for decorative details on the garment, if desired
Tools
- Crochet hook appropriate for your yarn.
- Stitch markers
- Yarn needle
- Sharp scissors
- Measuring tape
Optional:
- Magnetic snap
- Fabric lining
- Decorative beads
- Embroidery thread
- Chain or crochet strap around the shoulders.
Cotton yarn is particularly good for a firm bag that is well stitched.
Finished Size
The final bag will be about:
Width: 10–12 inches
Height: 8–9 inches
When using a strap, the length is 25–45 inches per preference.
The bag can easily be made smaller or larger with the number of rows and starting chain.
Pattern Notes
Here are some straightforward crocheting tips to bear in mind before you start crocheting:
- Count stitches at the end of each row.
- Maintain consistent tension.
- Maintain similar sizes between the two butterfly wings.
- Prevent pieces from being assembled.
- Reinsure the points of the strap.
- Carefully weave in loose yarn ends.
By the time you’re done with the final touches, the bag may look way more finished.
How to Crochet the Butterfly Shoulder Bag
Let’s now make the large bag and its fabulous butterfly accents. The body is the first piece that you will crochet, then you will make the wings separately and finally put it all together to make a lovely shoulder bag.

Step 1: Crochet the Front Panel
First make a foundation chain of the width you want your bag to be.
Crochet across the chain in rows of single or half double crochet stitches.
Repeat alternating working back and forth until desired height is attained.
The sides should be straight, so check the stitch count periodically.
A steady tension will help to form a nice smooth, professional looking panel.
Step 2: Crochet the Back Panel
Repeat steps 7-4 to create the back of the bag.
Attempt to make both panels the same size.
Set them up before proceeding.
If one panel is a little wider or taller, adjust it prior to assembly.

Step 3: Create the Side and Bottom Sections
If a bag is deeper, crochet the narrow side pieces and the bottom piece.
These pieces come in various widths, which means the final bag will be different sizes.
Stitch tightly, as these areas will be more stressed when the bag is filled.
Take care to sew the strips to the front panel before you sew the back.
Step 4: Join the Bag
Make sure to join the bag together in the right way.
Attach front and back panels together, inside-to-inside.
Using a yarn needle, sew around the sides and bottom.
Maintain even and close stitches.
Leave the top open.
After connecting, turn the bag a little and form the bag in such a way as to have the corners positioned nicely.
Step 5: Crochet the Butterfly Wings
The main ornament is in the form of wings.
With your contrasting yarn, start with a small center section.
Stitch in the round with chains, single, half double and double crochet stitches.
Make two big wings and two smaller wings.
If the shape is not precisely the same initially, don’t worry. The edges can be straightened and defined with blocking.
Try out two or three colors that complement each other around the outside edges for the butterfly wing crochet pattern effect.
Step 6: Form the Wings
Place both wings on top of each other and compare the shape.
If one wing appears distinctly different, make a tension adjustment.
Decorative edges can be made with slip stitches or single crochet.
Contrasting borders are superbly effective on the wings to set them off against the bag.

Step 7: Add the Butterfly Body
Crochet a very narrow oval or small cylindrical piece with black or dark brown yarn.
This is where the butterfly’s body will be.
Stitch across both rows of wings.
Before tying the stitches, be sure to center the body.
Step 8: Add the Antennae
Make two very small chains with black yarn.Make 2 small chains with dark yarn.
Place them on top of the butterfly body.
The antennae can be bent a bit to make them look more natural.
Small details such as these can make the butterfly look surprisingly real.

Step 9: Attach the Butterfly to the Bag
Attach the finished butterfly to the front of the bag.
Center it carefully.
Temporarily pin wings before sewing.
First sew the body on then sew the wings on with tiny stitches.
If you want the wings to stand up slightly, don’t sew each section completely flat!
Step 10: Crochet the Shoulder Strap
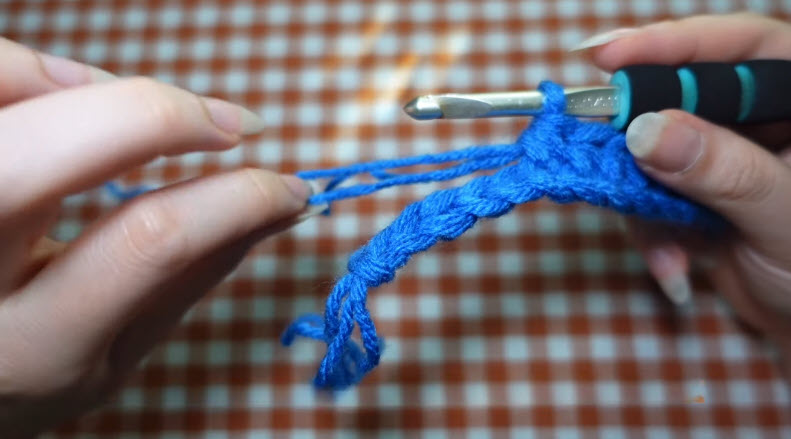
Make a long chain as desired for the length of the strap.
Make a stronger strap by working a few rows of sl st over the chain.
To create extra strength, you can crochet a second layer or crochet tightly around the edges.
Secure both ends of the bag to the inside.
Emphasize these points as the strap will bear the weight of all the contents in the bag.

Step 11: Add the Closure
Select a closure that’s in style.
You can use:
- Magnetic snap
- Zipper
- Crochet button
- Wooden button
- Ribbon tie
- Simple flap closure
- A magnetic snap is particularly convenient for everyday use.
- Carefully attach and affix it, to make sure the bag will close evenly.
Step 12: Add Decorative Details
You can now make the butterfly your very own!
Try adding:
- Small beads
- Pearl accents
- Embroidered dots
- Floral details
- Metallic thread
Creative Color Ideas
Since butterflies are naturally colorful, this pattern will allow you to experiment a lot. The bag may be kept sophisticated with two neutral tones or with several colors for a pop of bright personality.
Properly try out combinations like:
- Lavender (soft pink wings)
- Cream with blue dusty accents.
- black colored, deeply red winged
- Sage green with ivory details
- Navy Blue with lilac wings
- Beige, caramel and cream.
- White, pastel rainbow wings
- Brown with a golden yellow color
For a softer appearance, use the same color family for the bag and wings. If you want something eye-catching to wear, opt for using a different color to make the butterfly pop.
Creative Uses for This Pattern
A butterfly shoulder bag can be a component of numerous looks and occasions. It is more than a crochet accessory, it is a piece of decoration, due to its decorative shape.
Here are some creative ideas of how to use your finished bag:
- Be sure to wear it with everyday clothes.
- It is best to wear it with a summer dress.
- Take it along for weekend outings.
- Carry it as a lightweight travelling bag.
- Bring it to be used at garden sales or other outdoor markets.
- Store small crochet items in your car.
- Use it to store personal accessories.
- Display it as part of a handmade fashion collection.
- Design matching bags in various seasonal colors.
- Combine with handmade crochet jewelry or hair products.
- The design can be used for casual and more formal clothes.
Tips for a Professional Finish
This design revolves around the butterfly, so it’s important to get the finishing work right.
You will need to compare the inside and outside of the wings before attaching them to the bag, so they are on a flat surface. If one wing is bulkier, carefully block it to make shapes look balanced.
Attach the center body first when attaching the butterfly. Then sew just a few stitches along the wings instead of sewing flat all over. This adds a bit of lift to the wings, and produces a more realistic three dimensional appearance.
Another feature to consider is the shoulder strap. Do a few passes of yarn at each of the attachment points so that the bag will be able to accommodate the things you use everyday.
Why Crochet Butterfly Bags are so Special
Crochet pieces inspired by nature are like a breath of fresh air and can’t be found in a store. The butterfly design adds some animation, color and softness to a plain bag.
Throughout this project you will also be able to practice many crochet skills. They will learn to use flat panels, shaping, color combinations, sew and make straps.
Butterfly wings are particularly helpful for the understanding of the possibilities of curves and pointed edges by varying the size of the stitch. When mastered, similar techniques can be used to create flowers, leaves, hearts and other decorative shapes.
This project is a lovely butterfly purse crochet pattern, a great way to work up some lovely crochet skills and make something useful.
Final Thoughts
Crochet butterfly shoulder bag is one of those useful design projects that brings creative happiness. The main bag offers ample storage for all your daily needs, but when you’re looking for a stylish accessory the elegant butterfly wings do the trick.